Leiningen Profile
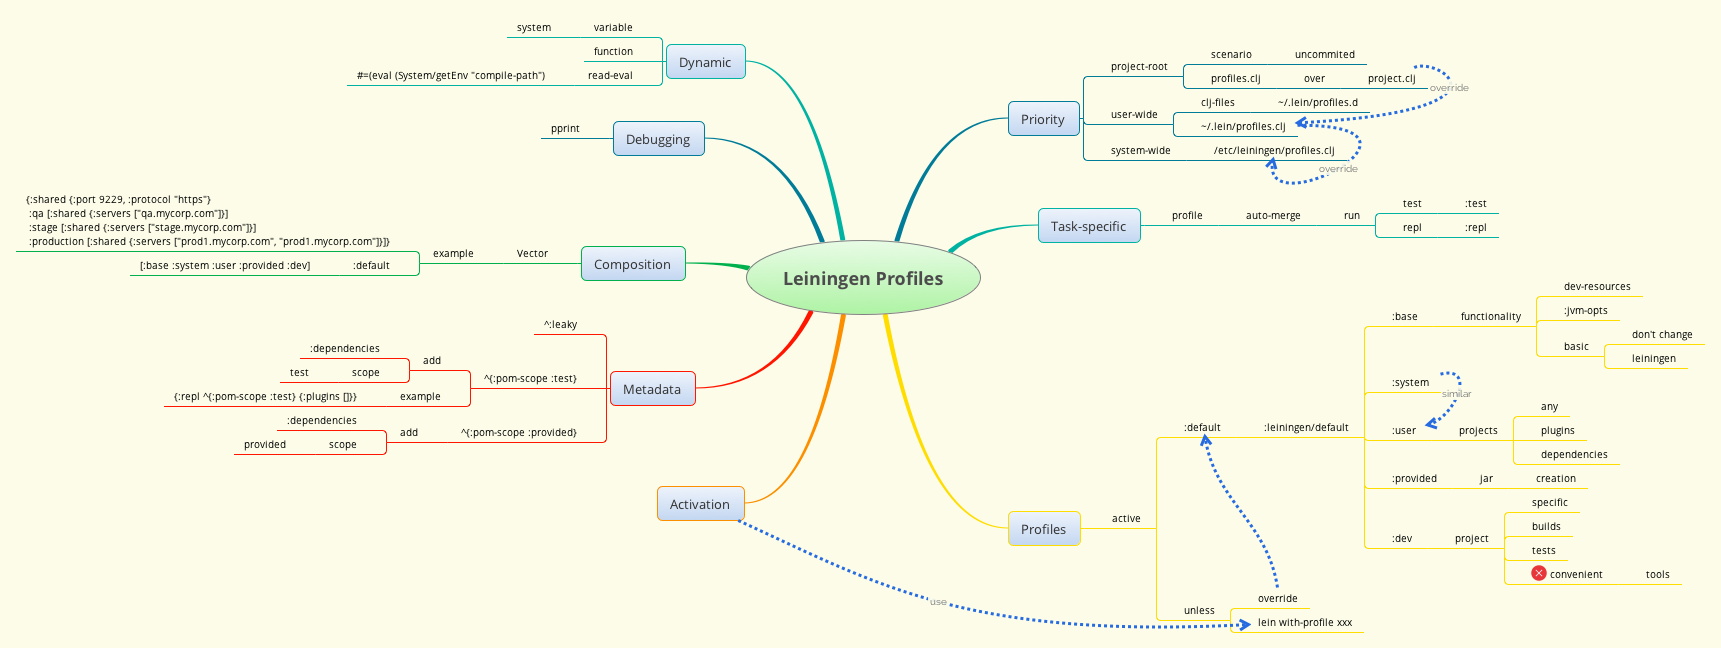
记忆用的Mindmap

标准的leiningen的工程目录结构
当我们使用lein new your-project-name之后,工程目录结构如下:
1 | . |
此处的project.clj就是这个工程的描述文件,不过内容是使用clojure编写的,展开如下:
1 | (defproject playground "0.1.0-SNAPSHOT" |
此时还看不到profiles的影子,不过试想一下这样的场景:某些工具只是开发时需要,打包artifact却不应包含——写过Node.js的应该对package.json中devDependencies不陌生,其实是一个道理。只不过在project.clj中是这样定义的:
1 | (defproject playground "0.1.0-SNAPSHOT" |
因为我使用emacs编程,除了亲和编辑源码的clojure-mode,还使用了cider这个与Clojure进程交互的工具,而clj-refactor.el则是Clojure中重构的神器,所以在开发的时候,需要显式地依赖进来(不过自CIDER 0.11.0 (Bulgaria)之后两者都自动引入了)。另外,写过servlet程序的人大概对于这个servlet-api很是熟悉,看到:provided想必也会会心一笑。
其实这里:dev和:provided是leiningen内置的两种profile,它们类型不同,功能也迥异。在继续深究之前,我们先想想profile应该具有的功能。
Profile的功能
Profile的主要功能和pom.xml以及package.json一致,描述当前工程的配置、为构建工具(leiningen)提供一套执行流程。具体来讲,包括项目的不同scope(compile/test/provided)的依赖、开发环境依赖、各种plugin的依赖,以及范围性质的依赖,比如:user,表明当前用户下所有的leinigen工程都会使用到该profile。
每个project(项目)当前可用的profiles,可以通过下面这条命令查看:
1 | //under root of project playground |
可能其他人的机器上看到的结果和我的不一致,这是正常的,原因是我在~/.lein/profiles.clj中配置过了。
默认Profiles
默认启用的profiles定义在:default当中,我们来查看default profile中包含哪些profiles?
1 | lein show-profiles default |
这五个profiles代表的含义,在官方文档中有详细的描述,这里我只简略地描述一下:
- base: leiningen使用到的最基本的配置项,包括设置jvm-opts参数、往resource-paths中添加dev-resources等。它是leinigen的一部分,不应该被修改;
- system: 和user类似,不过针对的是所有的用户;
- user: 对当前用户下的所有projects有效。所以不应该在project.clj中设置user profile.
- provided: 这个和pom.xml中scope是provided类似,只在生成jar的时候才有效,即生成pom.xml时,会把这个profile中定义的依赖以provided的scope添加进入pom.xml。
- dev: 指定project专属的开发工具时会用到。
特定任务(task-specific) Profile
除了上面的default profile,还有像:repl和:uberjar这样以任务名称命名的profile。顾名思义,当你运行repl或者uberjar任务时,这些profiles的配置项会被合并到当前工程的profile当中。举个例子,我们定义一个uberjar profile,如下:
1 | :uberjar {:aot :all} |
这里有个概念需要澄清,什么是:aot?
Clojure的代码总是会以两种方式被编译,aot和runtime。
aot是指Ahead of Time Compilation,与之相对的是Runtime Compilation。 两者的区别就是aot会将生成的bytecode保存到磁盘上,也就是我们所熟知的class文件;而Runtime Compilation时的bytecode则在JVM终止后消失。
此时,当你运行lein uberjar时,就会首先在target/classes目录下生成clj源文件对应的class文件,打包包含clj和class文件;反之,如果不指定:aot,最终打出的jar包只会包含clj文件。
对于repl profile,这里也给出一个例子:
1 | :repl {:dependencies [^:displace [org.clojure/clojure "1.9.0-alpha3"]] }} |
现在当你在任意工程(project)之外运行lein repl的时候,默认的Clojure版本就是1.9.0-alpha3了,如下:
1 | nREPL server started on port 54003 on host 127.0.0.1 - nrepl://127.0.0.1:54003 |
这里说到在任意工程之外运行会有不一样的结果,隐含的一层意思是项目根目录下的project.clj描述文件的优先级比较高。
Profile的优先级
leiningen中有3类profiles定义:
- 项目范围:your-project/profiles.clj
- 用户范围:*(or ~/.lein/profiles.clj ~/.lein/profiles.d/xxx.clj)*
- 系统范围:*/etc/leiningen/profiles.clj*
优先级次序
这些profiles的优先级是这样的:项目范围 > project.clj > 用户范围 > 系统范围。其中项目范围的profile有一种典型应用:对当前项目进行个性化的配置(通过覆写project.clj中的配置),而不提交到git仓库。
定义profiles.clj
知道优先级之后,接下来的问题是我们该如何定义这样的profiles.clj呢?先看一下我的~/.lein/profiles.clj
1 | {:user {:plugins [[lein-codox "0.9.4"] |
这个文件定义了3种profiles,分别是:user, :dev, :repl. 语法结构是一个map的maps,通过keyword命名来区分。:user定义了插件、依赖和启动时自动绑定命名空间,:dev定义了依赖,:repl也定义了依赖,不过这个依赖前面用到了^:displace (Metadata),标识在具体的项目之外才会依赖此版本的Clojure.
启用Profile
前面提到leiningen默认会启用包含[:base :system :user :provided :dev]的leiningen/profile,default profile指向了leiningen/profile. 这里头其实包含了几层意义:
- profiles是可以自由组合的;
- default profile是可以敷写的;
- 完全可以显式地启用某些profiles.
如何组合这些profiles,官方文档中定义的很清楚,无须赘述。敷写default profile也比较简单,直接这么操作{:default [:profile-you-want]}. 那么只剩下如何显式地启用某些profiles了?答案是:with-profile.
1 | lein with-profile user repl |
这就是只启用user profile来运行repl命令了。
使用Metadata
这里的Metadata是用于描述profile自身,那么它们到底有什么作用呢?
文档中列举了3个Metadata: ^:leaky, ^{:pom-scope :test}, ^{:pom-scope :provided}. 并告诉我们在生成pom.xml时会根据Metadata的类型将profile中定义的依赖写入其中,但是并未讲述如何使用它们。其实很简单,只要像下面那样在profile的名字之后写上这些Metadata即可。
1 | :repl ^{:pom-scope :test} {:dependencies [[clj-http "3.1.0"]] } |
leiningen会自动把该profile的dependencies的scope设置成test,如下:
1 | :repl {:dependencies [ [clj-http "3.1.0" :scope "test"] ]} |
这段逻辑可以从leiningen的源码当中获得:
1 | (apply-profile-meta [default-meta profile] |
所以如果你指定:repl profile生成pom.xml时,clj-http就会出现在test scope的dependency定义中。
1 | lein with-profile repl pom |
生成的pom文件,如下:
1 | <dependency> |
其余主题Dynamic Eval和Debugging,文档中叙述的比较完整且简单。
参考链接
[1] Leiningen Profile